

How to Build Your SMS in Hubfleet
A practical, step-by-step playbook — from hazards and controls through to onboarded drivers with complete evidence on day one.
Who this page is for
Operators, safety managers and compliance leads who want to know — concretely — what it takes to stand up an SMS in Hubfleet. This is the build path, not a timeline or a features list. If you've ever asked "where do I actually start?", start here.
Who this page is for
Operators, safety managers and compliance leads who want to know — concretely — what it takes to stand up an SMS in Hubfleet. This is the build path, not a timeline or a features list. If you've ever asked "where do I actually start?", start here.
The build path at a glance
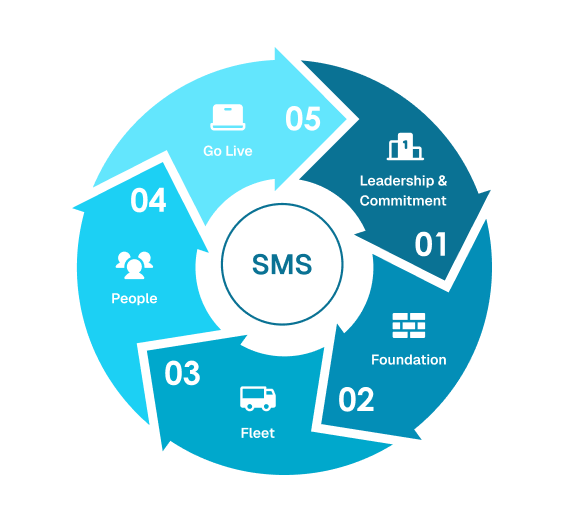
Hubfleet is modular. Some operators use us just for work diaries (EWD). Others add maintenance. Others run the full SMS. This page is the complete build path for the full SMS — pick up from whichever part matches what you actually need.
Hubfleet ships with a populated Risk Controls Library, plus training type, policy and procedure templates — so in most cases you're reviewing, customising and extending rather than building from zero. Hazards are the main thing you build from scratch, because they're inherently specific to your operation.
Hubfleet ships with a populated Risk Controls Library, plus training type, policy and procedure templates — so in most cases you're reviewing, customising and extending rather than building from zero. Hazards are the main thing you build from scratch, because they're inherently specific to your operation.
Part
What you build
Typical time
0. Leadership
Safety org chart, category leaders, escalation contact, policy signatory
Day 1
1. Foundation
Risk controls → hazards → training types → policies → procedures
Week 1–2
2. Fleet
Vehicles, combinations, pre-start checklists, permits, rego, insurance, service schedules
Week 2–3
3. People
Roles, training requirements, drivers, records, medicals, accreditations, fit-for-duty
Week 3–5
4. Go live
EWD rule sets, driver app rollout, dashboards, alerts, evidence collection
Week 5–8
Why this order matters
Risk controls are the reusable atoms — everything else links to them. Hazards link to controls. Training types link to controls. Policies mandate controls. Procedures implement controls. Pre-start checklists live on vehicle types. Roles bundle training requirements. Driver records are completions against training types. Build the Risk Controls Library first and everything else snaps into place.
Part 0
Leadership: who owns safety
Goal:
a clear safety governance structure inside Hubfleet — so notifications and escalations all route to the right people before you start building anything else.
Why this comes first
Every subsequent part of the build — hazards, controls, policies, NCRs, incidents — routes notifications and approvals through the people named here. Set the governance once, and it applies consistently across every module you switch on.
Nominate your safety leadership
In Hubfleet's Safety Org Chart, assign:
- Overall Safety Leader — the person accountable for safety across the whole operation
- Safety Category Leaders — assign a leader to each safety category. Same person across all four, or different people per category, depending on your size:
- Fatigue
- Load & Dimension
- Maintenance
- General Safety
- Escalation Contact — typically the transport executive or another responsible officer; the person notified when an issue needs to go above a category leader
Hubfleet uses these assignments to route hazard, incident and NCR notifications, escalate overdue corrective actions, and attribute safety decisions in the audit trail.
Confirm your policy signatory
Identify who will formally sign off the policies you'll create in Step 5 — usually the CEO, a director or another responsible officer. Their name, title and signature appear on every policy Hubfleet generates.
End of Part 0
Your governance layer is in place. Every event raised from here on has a named owner and a named escalation path.
Part 1
Foundation: the SMS itself
Goal:
a live, linked-up Safety Management System with your Risk Controls at the centre, and hazards, training types, policies and procedures all connected to it.
How this fits together
Risk controls are the reusable atoms. They sit in a central library classified by hierarchy of control (elimination → substitution → engineering → administrative → PPE), Safety Category, SMS Standard and Industry Sector. Controls aren't risk-rated — they're the building blocks that hazards, incidents, NCRs, training types and procedures all reference. Each control also links to the training types required to execute it, so you see training coverage against every control.
Hazards are risk-rated (likelihood × consequence) and live in Hubfleet's hazard reporting feature — table view for management, risk register view once rated. Each hazard links to the controls that manage it.
There's no shipped "hazard library" because hazards are inherently specific to your operation — but the reporting, risk assessment and actions workflow is all built in.Want regulatory grounding? See Mapping the NHVR Master Code to Hubfleet — the companion guide that shows how every NHVR Activity, Control and Hazard maps onto Hubfleet, with the full 45-Activity mapping table.
Hazards are risk-rated (likelihood × consequence) and live in Hubfleet's hazard reporting feature — table view for management, risk register view once rated. Each hazard links to the controls that manage it.
There's no shipped "hazard library" because hazards are inherently specific to your operation — but the reporting, risk assessment and actions workflow is all built in.Want regulatory grounding? See Mapping the NHVR Master Code to Hubfleet — the companion guide that shows how every NHVR Activity, Control and Hazard maps onto Hubfleet, with the full 45-Activity mapping table.
Step 1. Review and extend the Risk Controls
Start here. Hubfleet ships a populated Risk Controls Library covering the common controls for Australian heavy vehicle operations — you can browse the full public library here. Each control is classified by:
- Control Type — hierarchy of control (elimination, substitution, engineering, administrative, PPE)
- Safety Category — Fatigue, Maintenance, Mass & Dimension, Safety
- SMS Standard — which of the 5 SMS outcome areas the control supports
- Industry Sector — linehaul, urban delivery, agriculture, construction, mining, waste, etc.
- Recommended Policies & Procedures — suggested supporting documents
Work through the library:
- Review each control — keep, tweak wording to your operation, or mark out-of-scope
- Add controls unique to your fleet (specialist load restraint methods, customer-site controls, bespoke fatigue practices)
- Confirm Control Type, Safety Category and Industry Sector for anything you add
Controls aren't risk-rated — that happens against hazards in the next step.
Step 2. Identify and risk-rate your hazards
Hazards are operation-specific — your depots, routes, sites, loads, customers — so this is where your operation's real thinking starts. Hubfleet doesn't ship a generic hazard library (it would either be too vague to be useful or pretend to know your operation), but it does give you the tooling to build and manage your own: a hazard reporting feature anyone in the field can use, a risk assessment section on every hazard, an actions workflow for improvements, a hazards table view and a risk register view where hazards appear once risk-rated.
For each hazard:
- Describe it clearly (what, where, who is exposed)
- Risk-rate it using likelihood × consequence — it appears in the risk register
- Link the controls from the Risk Controls Library that will manage the risk
- Add improvement actions where the residual risk is still too high
- Flag any gap where no suitable control exists yet — then go back to Step 1 and add it
Typical starting categories: fatigue exposure, mass and load restraint, vehicle defects, chain of responsibility exposure, fitness-for-duty impairments, weather, remote operations, livestock welfare, dangerous goods, work-at-heights at loading, customer-site hazards.
Step 3. Establish training types
Training types are your catalogue of every competency, credential and accreditation anyone in your operation needs to hold. It's the backbone of the people system — roles, driver records and expiry tracking all reference it.
Competency-based — load restraint, fatigue awareness, EWD operation, pre-start procedure, CoR awareness, incident reporting, hazard reporting, dangerous goods handling, manual handling, working at heights, spotters, fit-for-duty self-assessment.
Credential-based — HR / HC / MC driver licence, dangerous goods licence, high-risk work licences (forklift, crane, EWP), medical certificate, first aid, white card.
Accreditation-based — BFM, AFM, NHVAS Mass / Maintenance / Fatigue modules, WA accreditation, CLOCS-A accreditation, customer-specific site inductions.
Each training type gets an expiry rule (never, fixed period, rolling renewal) and an automated alert window.
Step 4. Link controls to their required training types
On each control, link the training types a person must hold to execute it. This is the step most platforms skip — and the one auditors care most about.
- "Load Restraint Control" → requires "Load Restraint Training"
- "Operate Heavy Vehicle" → requires "HR/HC/MC Licence" + "Medical Certificate"
- "Enter Site X" → requires "Site X Induction"
Once linked, each control shows you how many people in the organisation need that training and the % who have completed it — so training coverage against every control is visible at a glance.
Step 5. Create policies
Policies are the mandate — the formal statement that your operation will use the controls defined in Step 1. Each control already has Recommended Policies & Procedures attached as a starting point, and you can browse the full public policy & procedure template library here.
Hubfleet provides policy templates aligned to HVNL Reform for Safety, Risk Management, Fatigue, Mass, Maintenance, Fit for Duty, Training & Competency, and Incident Investigation.
- Customise each template with your company name, CEO signature, and operation-specific detail
- Link each policy to the controls it mandates
- Set version control and a review cycle
Step 6. Create procedures
Procedures are the how — the step-by-step instructions that implement each control. Use Hubfleet's procedure templates for common heavy-vehicle operations as a starting point, customise for your fleet, and link each procedure back to the control(s) it implements.
End of Part 1
You have a fully linked SMS with the Risk Controls Library at the centre: hazards are risk-rated and link to controls, each control shows its required training and live coverage %, policies mandate controls, procedures implement controls. This is the foundation everything else snaps into.
Part 2
Fleet: vehicles, equipment and their compliance data
Goal:
every asset in your fleet recorded in Hubfleet with the pre-start checks, service schedules, permits and documents it needs to operate legally.
Step 7. Upload your fleet
Import every vehicle and piece of equipment — prime movers, trailers, rigids, light commercials, plant and equipment. Capture VIN, rego, make/model/year, GVM, GCM, odometer, engine hours.
Step 8. Configure vehicle combinations and axle groups
For every combination you operate (prime mover + trailer, truck-and-dog, B-double, road train, etc.):
- Define the combination
- Configure axle groups and legal mass limits per axle group
- Set permitted mass per combination (standard, CML, HML, PBS Level 1/2/3/4, OSOM permit)
- Flag any gap where no suitable control exists yet — then go back to Step 1 and add it
Step 9. Create pre-start checklists
Assign the correct pre-start checklist to each vehicle type. Hubfleet provides industry-standard templates — customise for specialist equipment (livestock crate condition, concrete agitator, tipper hoist, floats with ramps, construction plant).
Step 10. Add vehicle permits
Oversize / overmass permits, access permits, route restriction permits, state-specific permits. Upload the permit document, record expiry, attach to the relevant vehicle or combination.
Step 11. Upload registrations and insurances
For every vehicle: registration papers, CTP, comprehensive insurance, goods-in-transit, public liability. Expiry alerts fire automatically before lapse.
Step 12. Set up service schedules and reminders
For each vehicle and piece of equipment, configure:
- Km-based servicing (road vehicles, auto-incrementing from EWD odometer)
- Hour-based servicing (equipment, auto-incrementing from engine hours)
- Time-based servicing (rego renewals, fire extinguisher testing, calibrations)
Overdue services appear on the management dashboard so nothing quietly slips past its service interval.
End of Part 2
Your fleet is operational data, not a spreadsheet. Every vehicle has a checklist, a service schedule, current permits and documents — all with expiry tracking.
Part 3
People: roles, training and drivers
Goal:
every person in your operation assigned to a role, with their current credentials, training records, medicals and accreditations loaded — so Hubfleet knows who is qualified to do what.
Step 13. Create roles
Define the roles in your operation — Prime Mover Driver, Truck-and-Dog Driver, Livestock Driver, Linehaul Driver, Equipment Operator, Loader, Yard Hand, Supervisor, Maintenance Manager, Safety Coordinator, and so on.
Step 14. Assign training requirements to each role
For every role, pick the training types from the catalogue (built in Part 1) that someone in that role must hold. Include currency rules — e.g. "Load Restraint Training renewed every 2 years."
Once a driver is assigned to a role, Hubfleet automatically checks each required training type against that driver's records and tells you whether they've completed it, haven't completed it, or their training has expired. No spreadsheets, no manual cross-referencing.
Step 15. Set up fit-for-duty assessments
Configure the daily fit-for-duty assessment for your operation:
- Standard questions (sleep, fatigue signs, health, medication, psychological state, alcohol/drugs)
- Industry-specific additions (heat stress, dust exposure, vibration, night driving, passenger responsibility)
- Escalation rules — who gets alerted when a driver flags a concern
Step 16. Onboard drivers and operators
For each person:
- Create their profile
- Assign their role (or roles, if multi-skilled)
- Upload their driver licence (linked to a credential-based training type)
- Upload medical certificate
- Upload training records — induction, role-specific training, competency sign-offs
- Upload accreditation letters — BFM, AFM, NHVAS modules, WA accreditation, CLOCS-A where relevant
- Record any endorsements, HRW licences, dangerous goods licences
Because each role carries its required training types, Hubfleet immediately shows the status of every requirement for every driver — done, not done, or expired. Gaps show up on the dashboard the moment they exist, not six months later at audit.
End of Part 3
Every person is onboarded, assigned, credentialed and tracked. Expiry alerts run automatically. Training gaps are visible on the dashboard, not hidden in a filing cabinet.
Part 4
Go live: switch the system on
Goal:
drivers using the app daily, dashboards lit up, evidence collecting automatically from day one.
Step 17. Configure EWD rule sets per driver
Assign each driver their applicable fatigue rule sets — Standard Hours (12hr), BFM, AFM, two-up variants, WA Solo / WA 2-Up, Exemption Notice rules, Alternative Compliance when it commences, and any custom AFM rule sets your operation runs.
Step 18. Train drivers on the mobile app
Short, hands-on sessions covering EWD, pre-start checks, fit-for-duty, defect reporting, hazard reporting and incident reporting. Most drivers are productive after a single 2-hour session — the app is designed to be faster than paper, not a second job.
Step 19. Turn on dashboards, alerts and escalations
Confirm the management dashboard is live, automated alerts are firing to the right people, and escalation paths work end-to-end. Run a deliberate test incident if helpful.
Step 20. Start collecting evidence
From day one, every pre-start, every EWD entry, every fit-for-duty declaration, every hazard report and every defect creates timestamped evidence — GPS-verified where captured in the field — that rolls up into your PSOE audit pack, alongside corrective actions and other admin-entered records. See the PSOE Evidence Framework for how this maps to audit.
One central Corrective Actions Register
Inside each hazard, incident, NCR and asset fault, your team creates the corrective actions needed to close the issue out — with an owner, a due date and closure tracking. Those actions roll up into a single central Corrective Actions Register, giving you one place to monitor every open action across the operation. There is no separate CAR to configure or maintain — it stays current because it is generated by the workflows your team is already using. This is what auditors look for under SMS outcome area 4 (Assurance, Monitoring and Improvement).
You're operational
Your SMS isn't a binder on a shelf — it's a live system your whole operation runs through every day. Now the only thing between you and audit confidence is time: 6–12 months of operating evidence, collected automatically.
What Hubfleet gives you out of the box
So you're not starting from a blank page on any of this:
Compliance foundations
- Risk Controls Library — populated control templates, classified by hierarchy of control, Safety Category, SMS Standard and Industry Sector
- Policy templates — Safety, Risk, Fatigue, Mass, Maintenance, Fit for Duty, Training, Incident Investigation — aligned to HVNL reform
- Procedure templates — common heavy-vehicle operations
- Training type catalogue — starter set of competencies, credentials and accreditations
Operational templates
- Pre-start checklist templates — prime movers, trailers, tippers, livestock, concrete, flat-tops, low loaders, light commercials, construction plant
- Fit-for-duty assessment templates — standard + industry add-ons
- EWD rule sets — every Australian fatigue rule set
Evidence & audit
- KPI dashboards(coming soon) — pre-built dashboards covering fatigue breaches, incident frequency, maintenance compliance, hazard close-out time and training currency are on the roadmap
- PSOE scoring templates — for self-assessment and mock audit
Common Questions
Do I have to do all of this before go-live?
No — Hubfleet is modular. Plenty of operators start with just work diaries (EWD), add maintenance when they're ready, and layer in the full SMS later (or never). This page is the full build path for operators who do want the complete SMS; if you only want EWD, or EWD + maintenance, your setup is much shorter and your starting point is Part 2 or Part 4 rather than Part 1. Talk to us about what you actually need — we'll scope the build to match.
Can we do this without a consultant?
Many operators do, using Hubfleet's templates and in-app guidance. Larger or more complex operations often engage one of our implementation partners for 2–4 weeks of support during Parts 1 and 3. Either path works.
We already have policies and procedures — do we throw them out?
No. Upload what you have. Hubfleet's value is the linking — tying your existing policies to controls, hazards, training types and evidence. Starting with your content often works better than starting with ours.
What if we operate across multiple states or jurisdictions?
Hubfleet supports every Australian fatigue rule set in one platform — HVNL jurisdictions, WA (via WAHVA), two-up variants, exemption notices and custom AFM rule sets. Configure per-driver, and rules apply automatically based on where the driver is operating.
How does this work with CLOCS-A accreditation?
CLOCS-A accreditation letters and ongoing evidence (driver training, vehicle standards, reporting) are managed as training types, vehicle attributes and evidence records inside Hubfleet — the same plumbing as everything else.
Related Solutions
Explore how Hubfleet's modules work together for mining transport compliance:
.avif)
Hubfleet Platform Overview

Mapping the NHVR Master Code to Hubfleet

HVNL Reform Implementation Roadmap

HVNL Reform Compliance Guide

Safety Management System

Risk Management

Policies & Procedures

Chain of Responsibility

Fatigue

Fit for Duty

Mass Management

Maintenance

PSOE Evidence Framework

Audit Preparation

Audit Readiness
Ready to build?

Start Free Trial
Recommended for most fleets
Best if you're ready to get drivers logging now and explore Hubfleet at your own pace.

Full platform access — every feature, no limits
Drivers can start on EWD today
Real EWD, SMS, and compliance reporting from day one
No upfront costs · No lock-in contract
Start Free Trial

Book your Demo
Best for larger fleets or complex setups
Best if you've got specific integration questions, multiple sites, or want a tailored walkthrough first.
Tailored to your fleet and use case
30 minutes with a Hubfleet specialist
See the platform mapped against your fleet's compliance obligations
Get HVNL and SMS questions answered live
Book your 30-Minute Demo
Want to see plans first?


500+ Australian operators
NHVR approved
Free trial
Australian-based support